Before starting you will need:
-
Administrative permissions in Okta Admin Console
-
Perplexity Enterprise organization and an active subscription with admin role
-
Verified organizational domain in Perplexity
-
Basic understanding of SAML concepts – Okta has published a guide covering the basic concepts
Expected Setup Time: 15-25 minutes
Skill Level: Intermediate
Requirements
Perplexity
-
Admin Role: Must have administrator permissions in your Perplexity organization
-
Enterprise Access: Active Enterprise subscription (includes SSO capabilities)
Okta
-
Super Admin Access: Administrative privileges in Okta Admin Console
-
SAML Application Creation: Ability to create custom SAML 2.0 integrations
-
User Management Permissions: Rights to assign applications to users/groups
-
Provisioning Access: Optional SCIM provisioning capabilities for automated user management
Other requirements
-
Ensure firewall allows HTTPS traffic to Perplexity endpoints
-
No proxy interference with SAML authentication flows
-
Have at least one test user account in Okta directory, with a Perplexity Enterprise license
-
Consider creating dedicated SSO test group in Okta for initial testing
-
Consider having a backup admin account with non-SSO access for emergencies
Configuring SSO in Perplexity
Step 1: Navigate to Organization Settings
-
Sign in to Perplexity Enterprise with your admin account
-
Click on your organization in the bottom left corner
-
Navigate to Identity in Organization settings
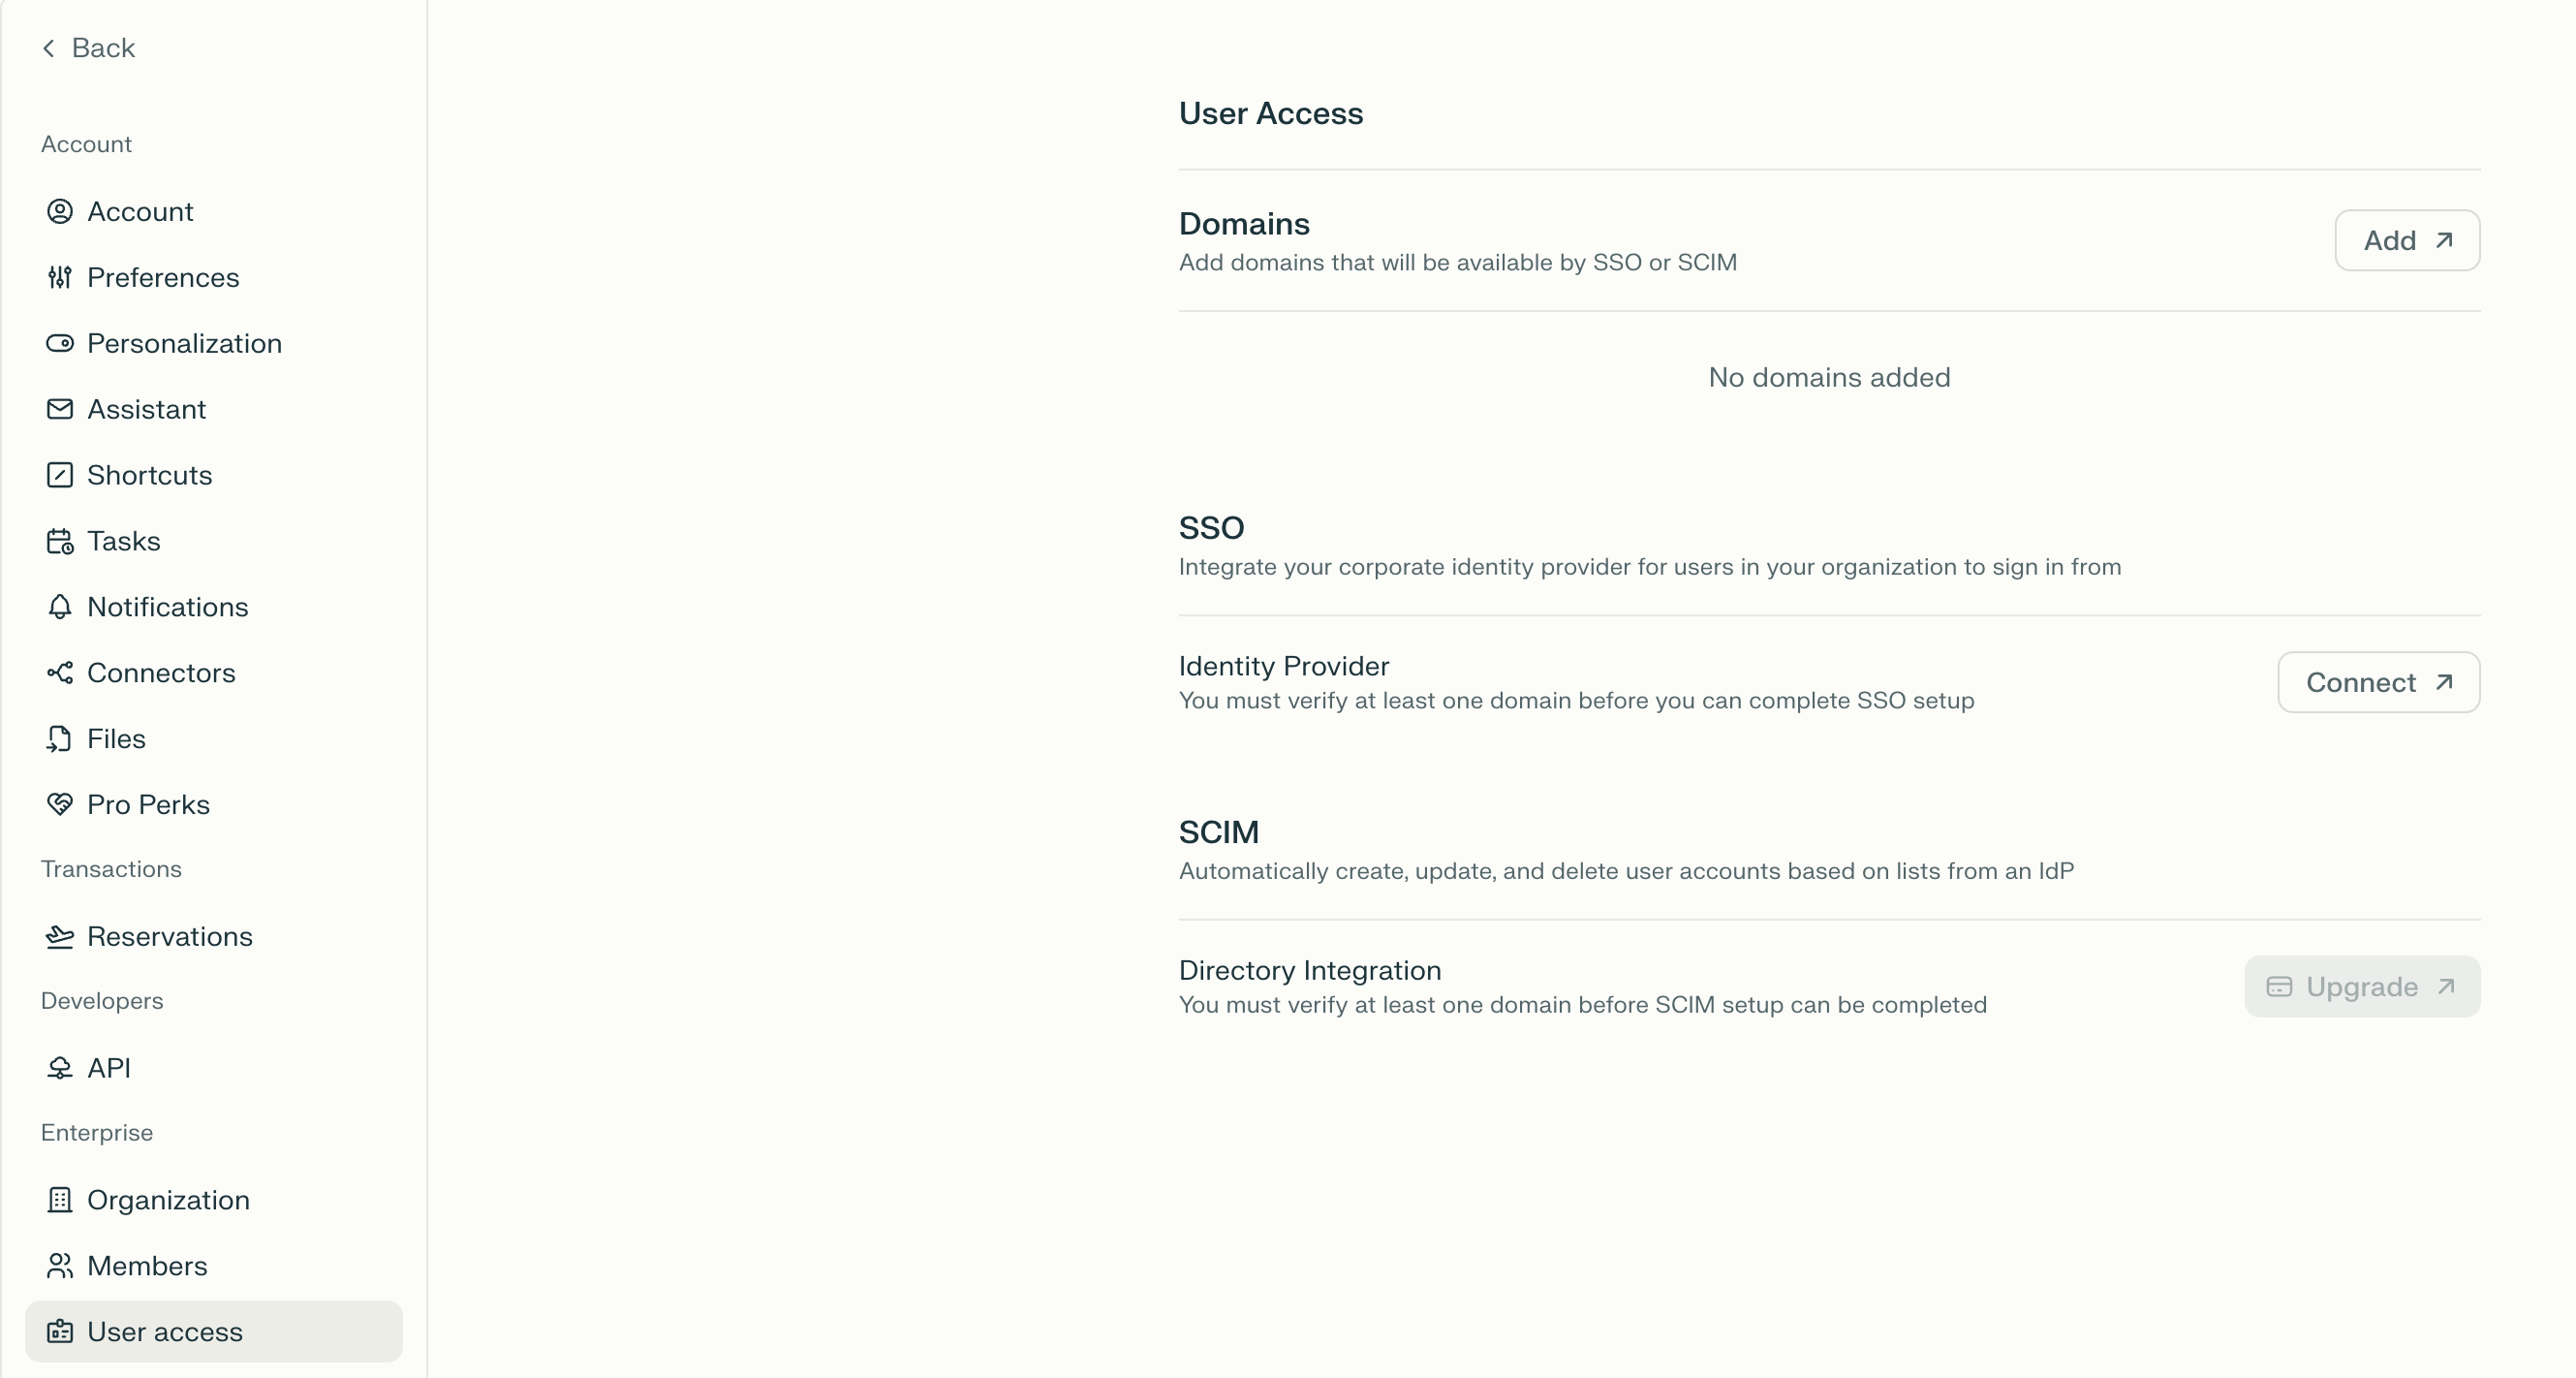
-
Click Begin setup in SSO and SCIM
Step 2: Add and Verify Organizational Domain
-
Click Add next to the Domains option
-
Enter your organization's domain (e.g.,
yourcompany.com) and click continue -
Copy the provided DNS TXT record
-
Add the TXT record to your domain's DNS configuration
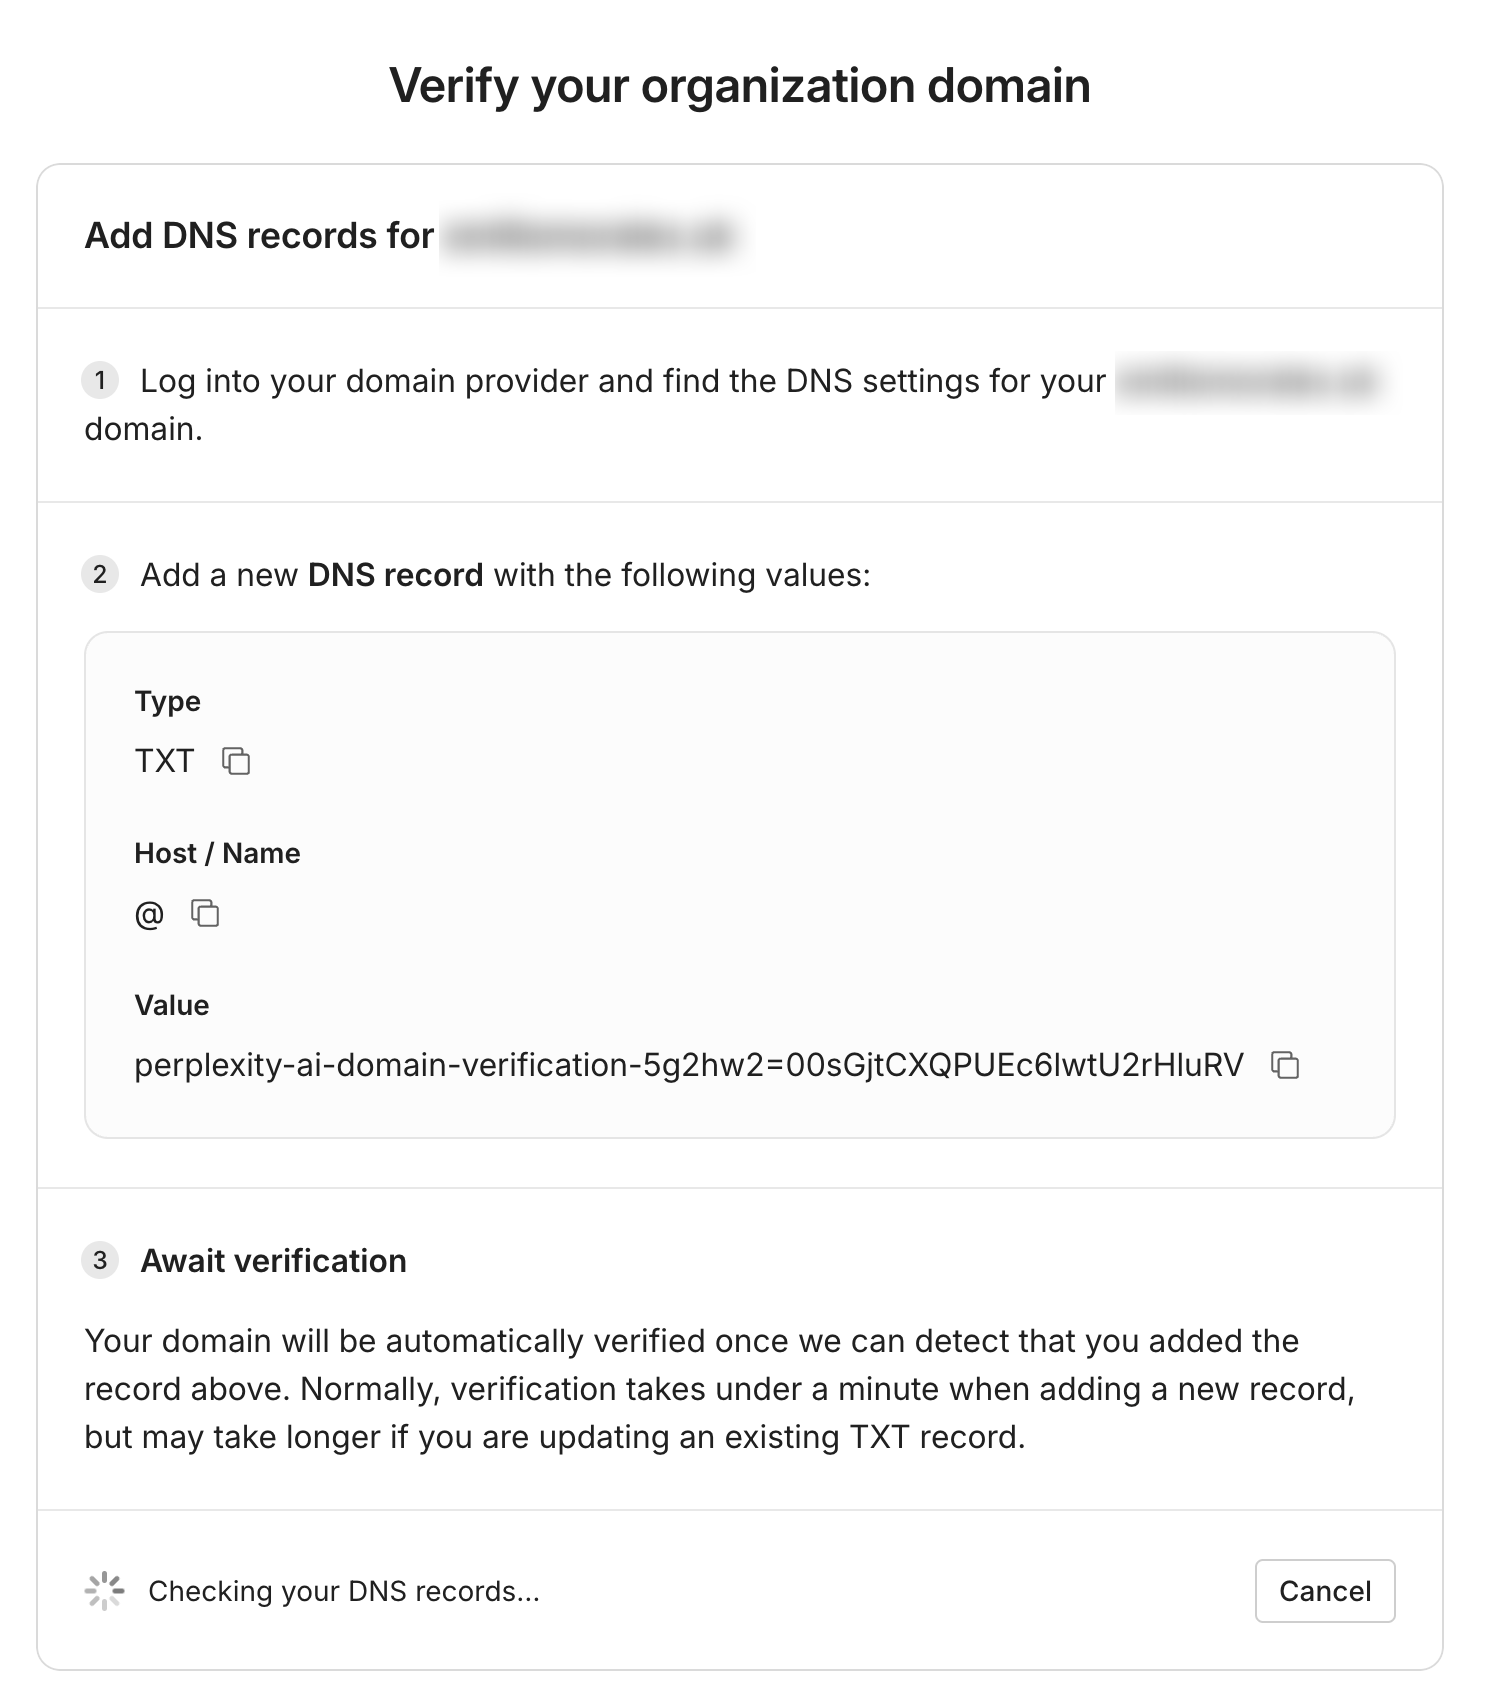
Your domain will be automatically verified once we can detect that you added the record above. Normally, verification takes under a minute when adding a new record, but may take longer if you are updating an existing TXT record. If that’s the case, you can set a TTL of 60 seconds.
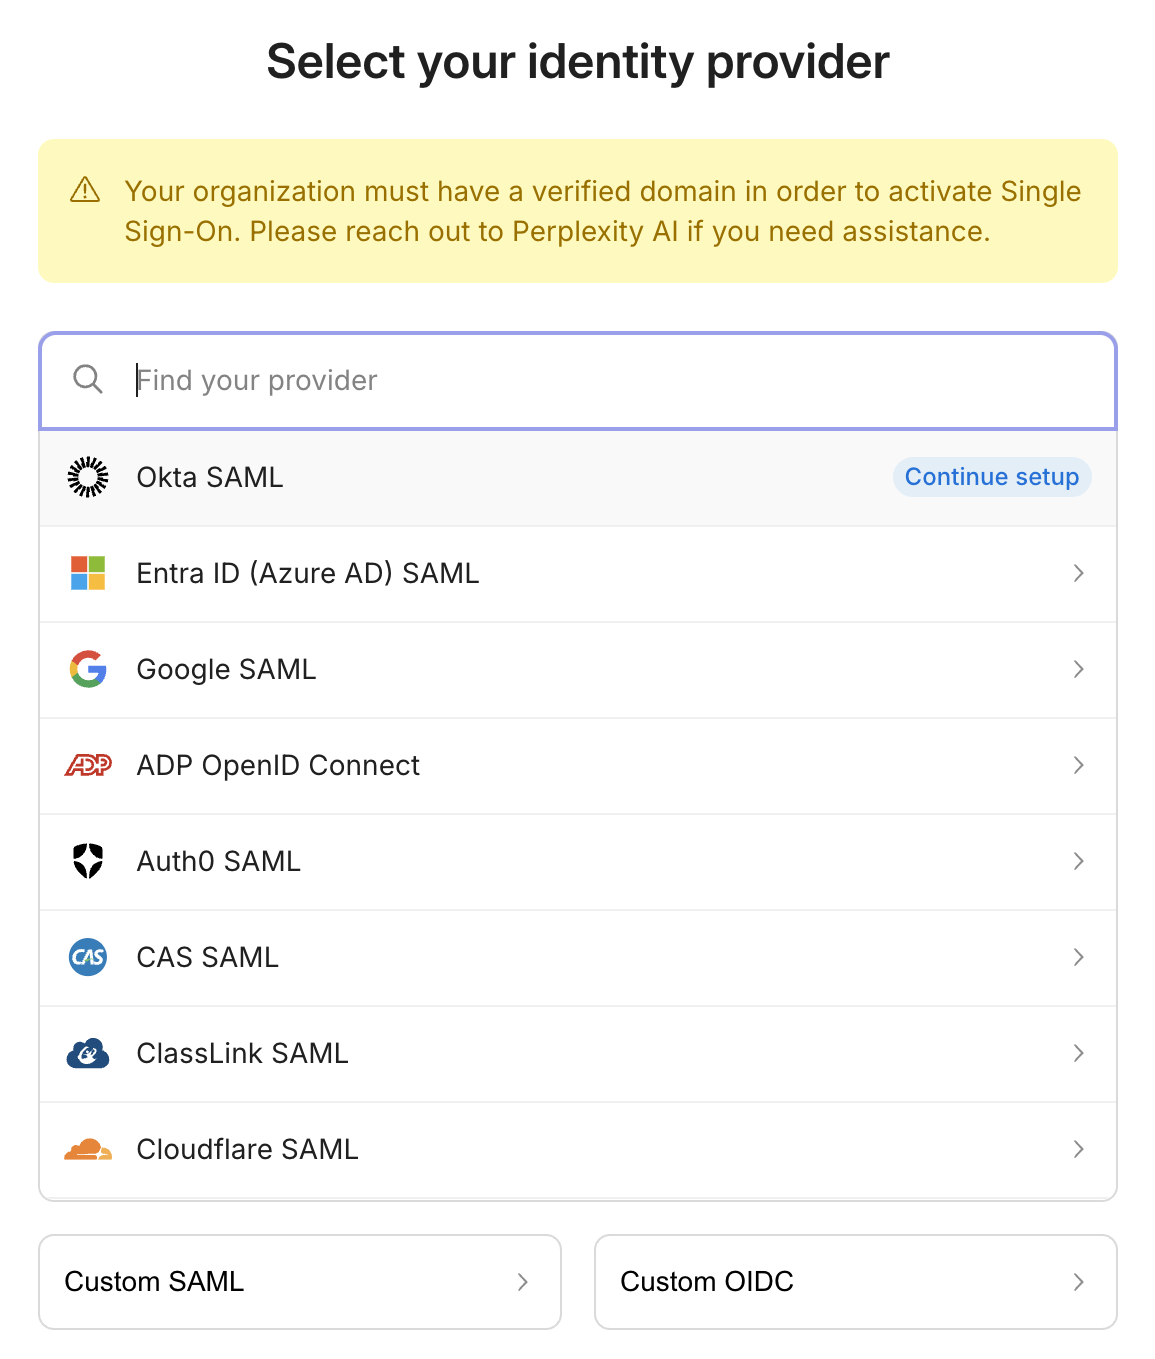
Step 3: Select Identity Provider
-
In Organization Settings, navigate to the Identity Provider section
-
Click Connect to begin setup
-
Select Okta from the available identity provider options
Step 4: Record Integration Parameters
Perplexity will display the following required parameters for configuring Okta:
-
IdP SSO URL - The endpoint where Okta will post SAML responses
-
Entity ID (Audience URI) - Unique identifier for Perplexity service
-
Required Attributes:
-
Email address (primary identifier)
-
Full name (first name + last name)
-
Organization name (optional)
-
Step 5: Prepare for IdP Configuration
Keep the Perplexity configuration page open in a separate tab as you'll need to reference these values during Okta setup. Note down the exact values for easy copy-paste into Okta.
1. Access Okta Admin Console:
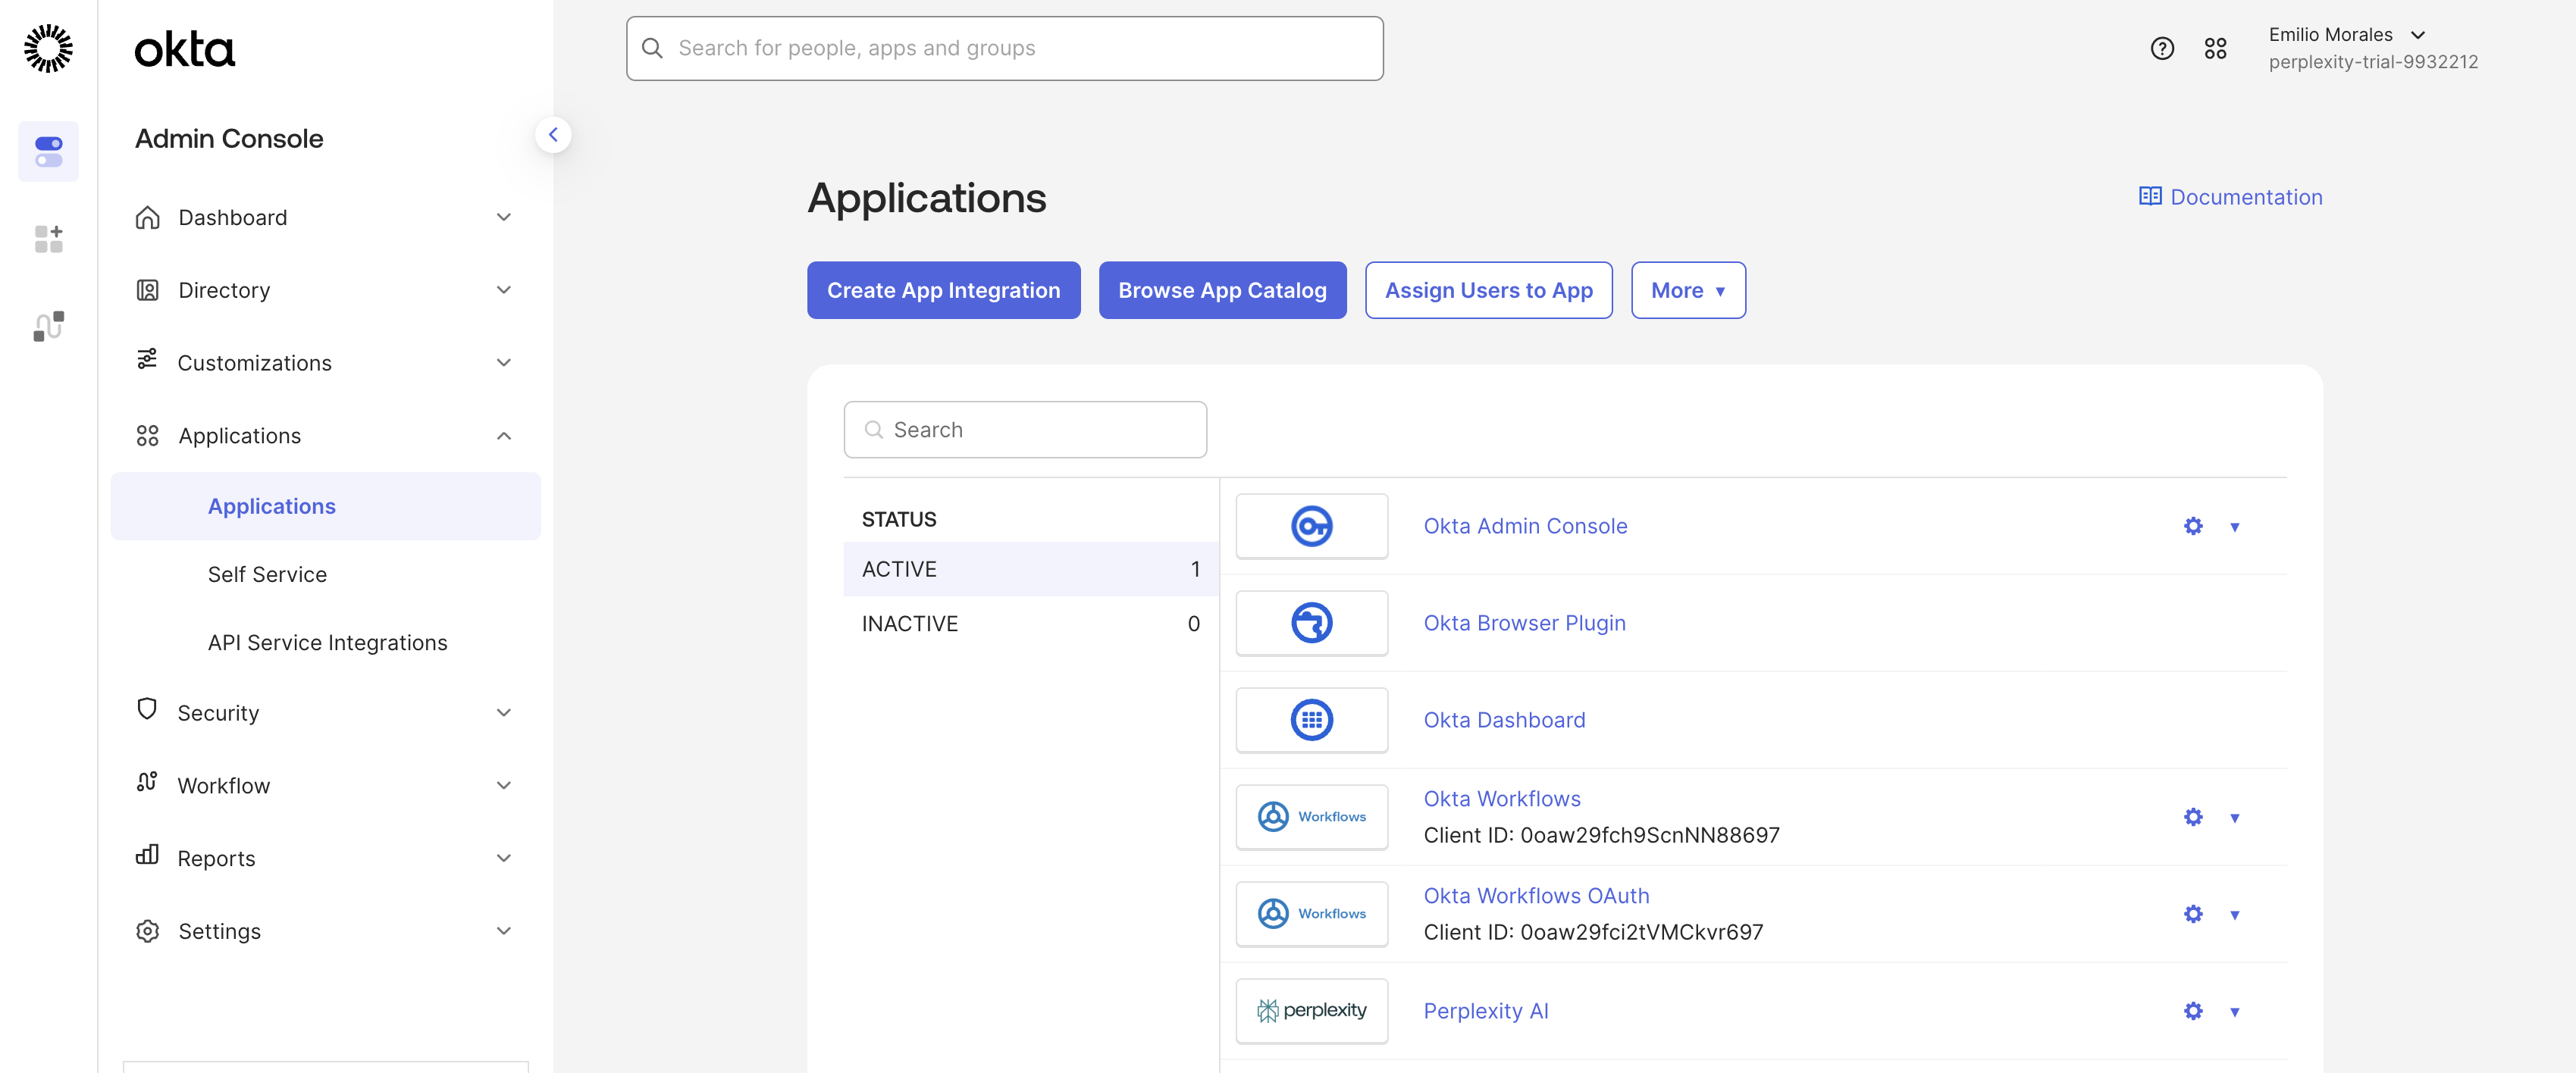
-
Navigate to your Okta Admin Console (typically
https://yourcompany.okta.com/admin) -
Sign in with your Okta Super Admin account credentials
-
From the Admin Console home page, navigate to Applications > Applications
2. Create SAML Integration
We will present you with step-by-step documentation that will explain how to create a SAML integration for Perplexity in Okta. Read it carefully and follow every step.
-
Click Create App Integration button
-
Select SAML 2.0 as the sign-in method
-
Click Next to proceed to app configuration
3. Configure General Settings
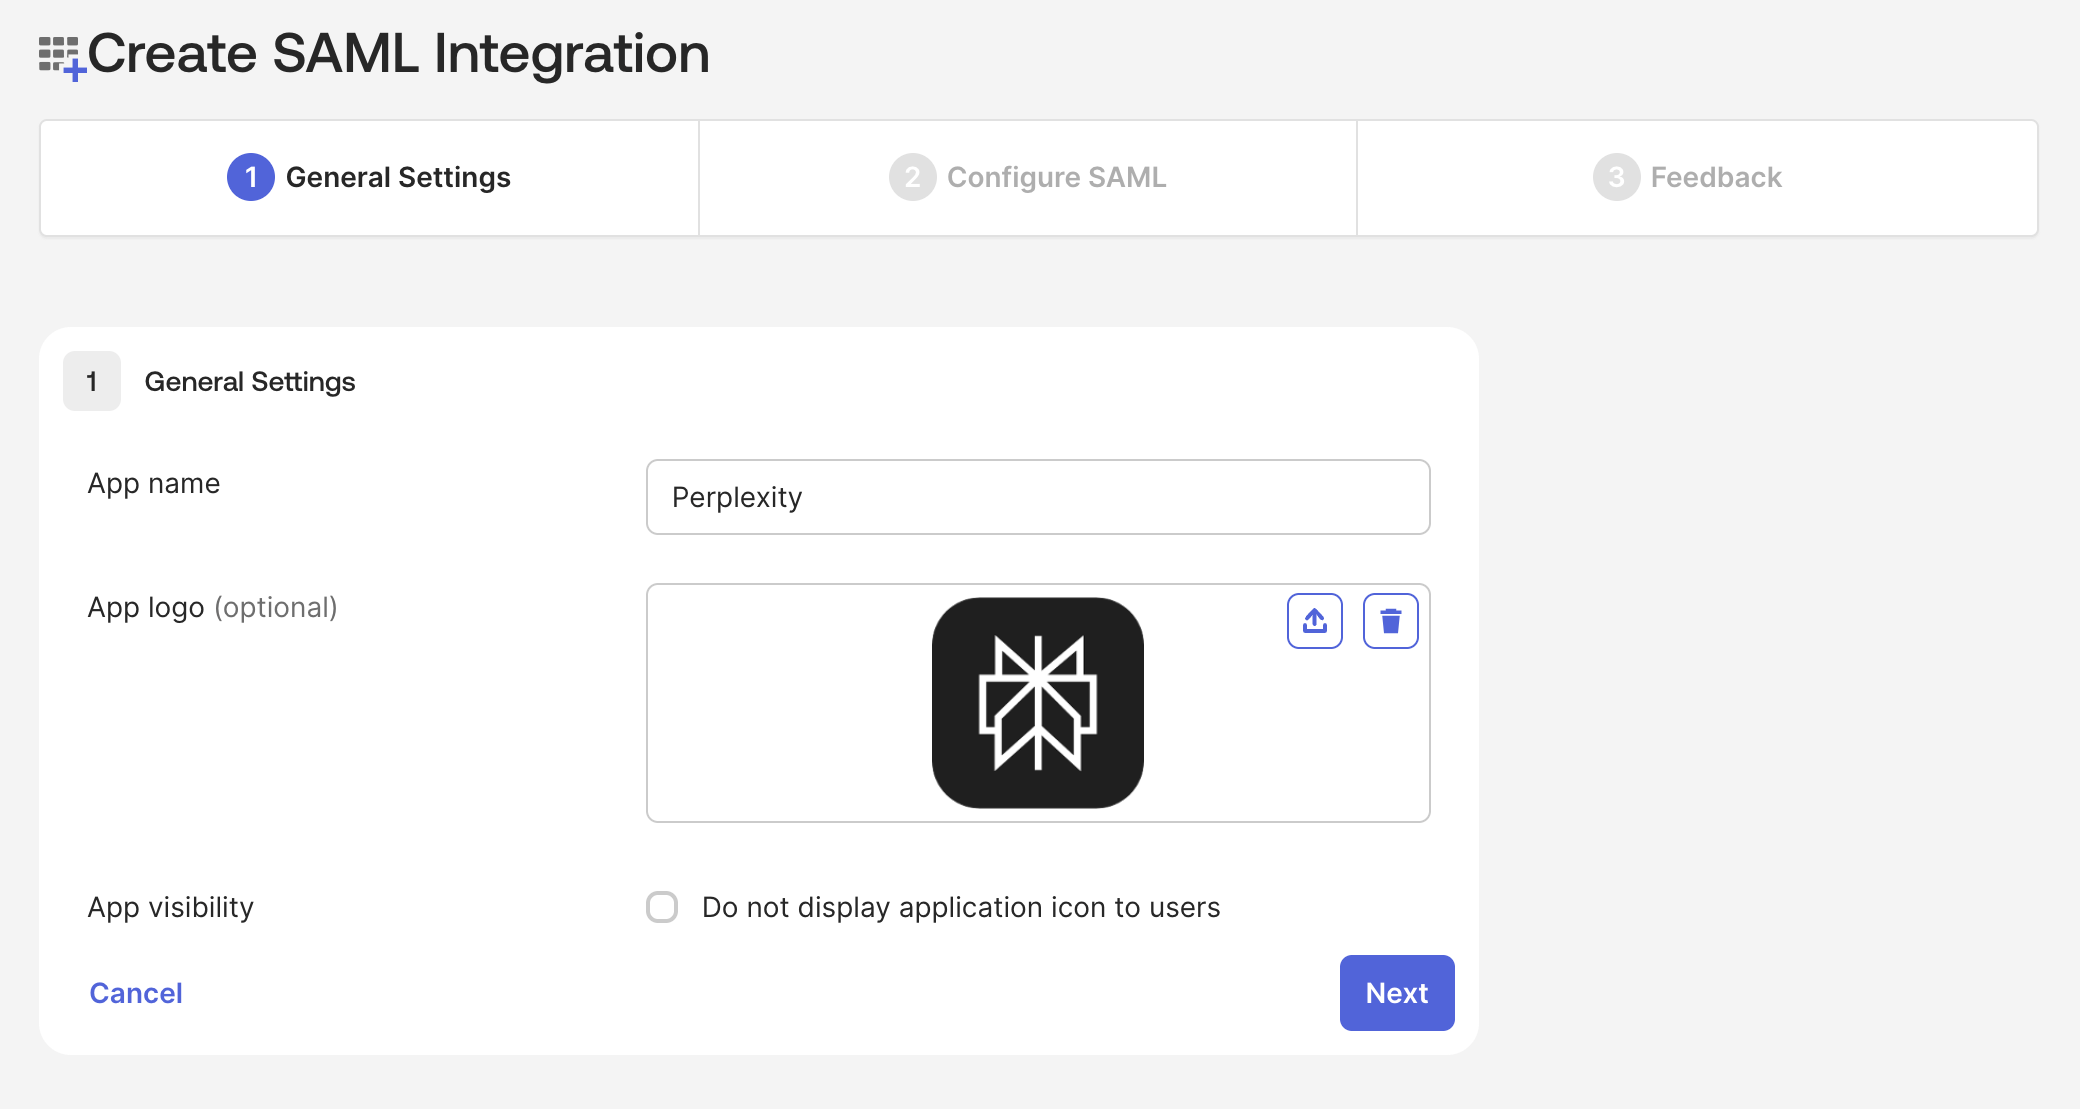
-
App name: Enter "Perplexity Enterprise" or other descriptive name
-
App logo: Upload Perplexity logo (optional but recommended for user recognition)
-
App visibility: Check "Do not display application icon to users" if you prefer icon-less experience
-
Click Next to proceed to SAML configuration
4. Configure SAML Settings
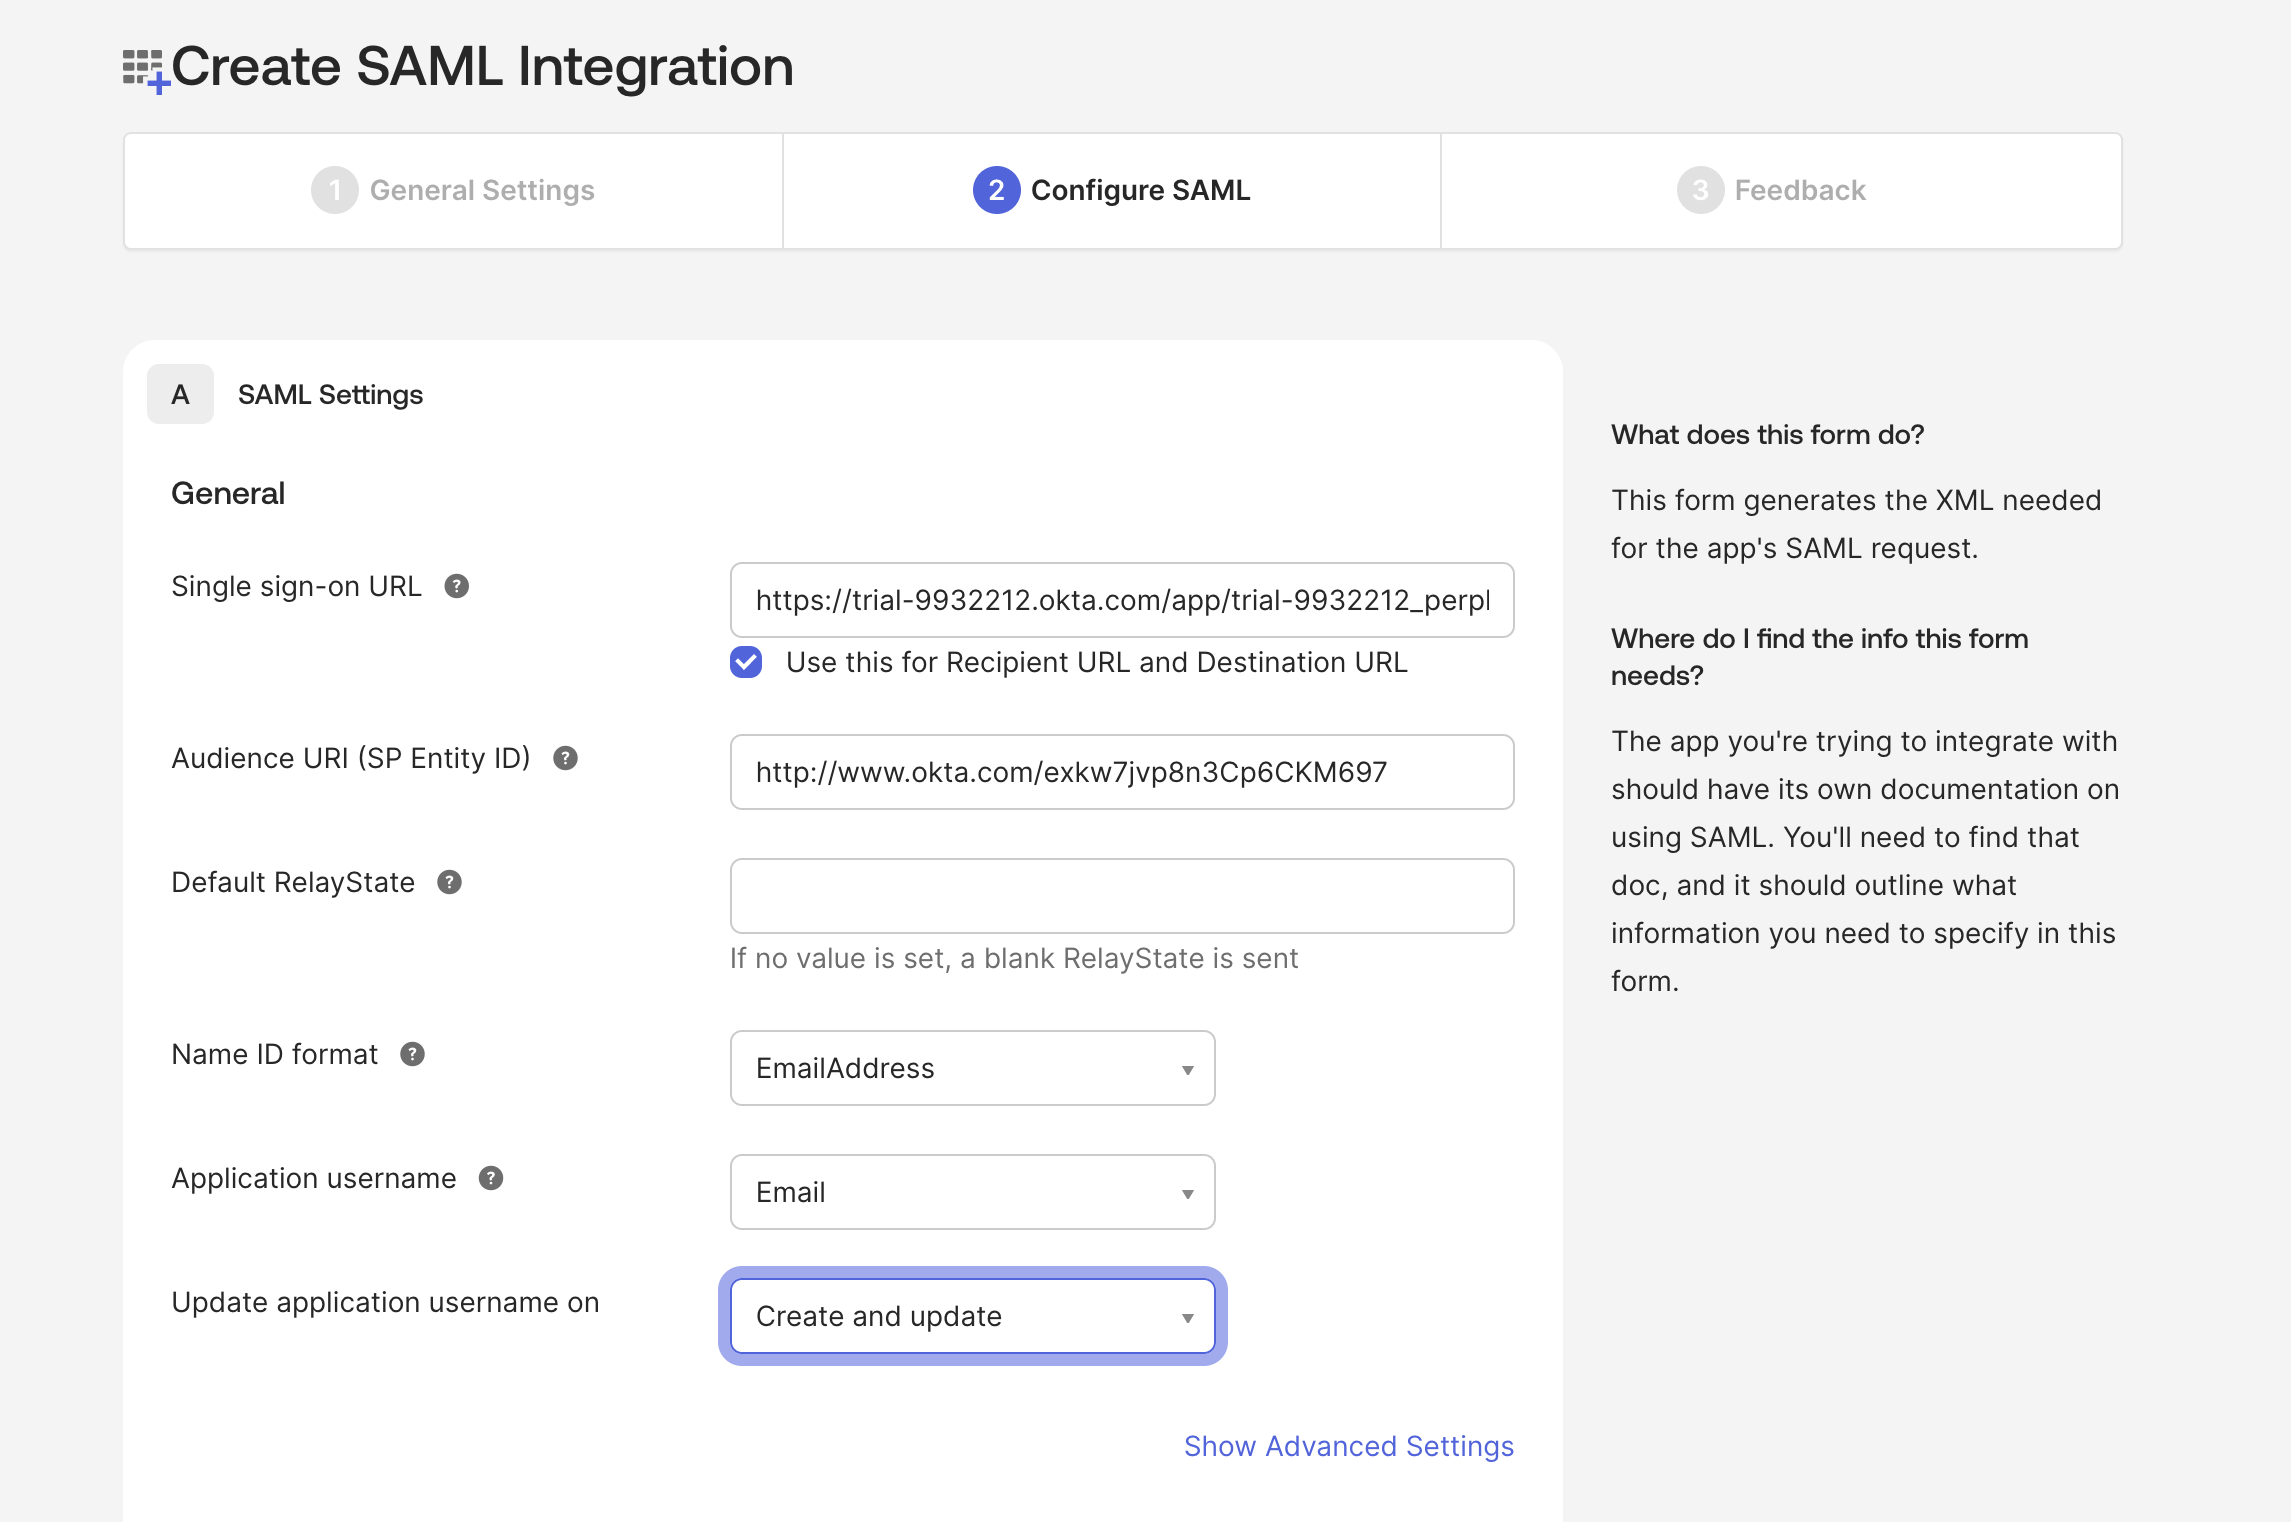
Enter the Perplexity parameters you recorded earlier:
Single Sign-On URL Configuration:
-
Single sign-on URL: Enter the ACS URL/IdP SSO URL from Perplexity configuration page
-
Use this for Recipient URL and Destination URL: Check this box
Audience URI Configuration:
-
Audience URI (SP Entity ID): Enter the Entity ID from Perplexity configuration page. Ensure this matches exactly with the value from Perplexity
Additional SAML Configuration
-
Default Relay State: Leave blank unless specified by Perplexity support
-
Name ID format: Select EmailAddress
-
Application username: Choose Email
-
Update application username on: Select Create and update
5. Configure Attribute Statements
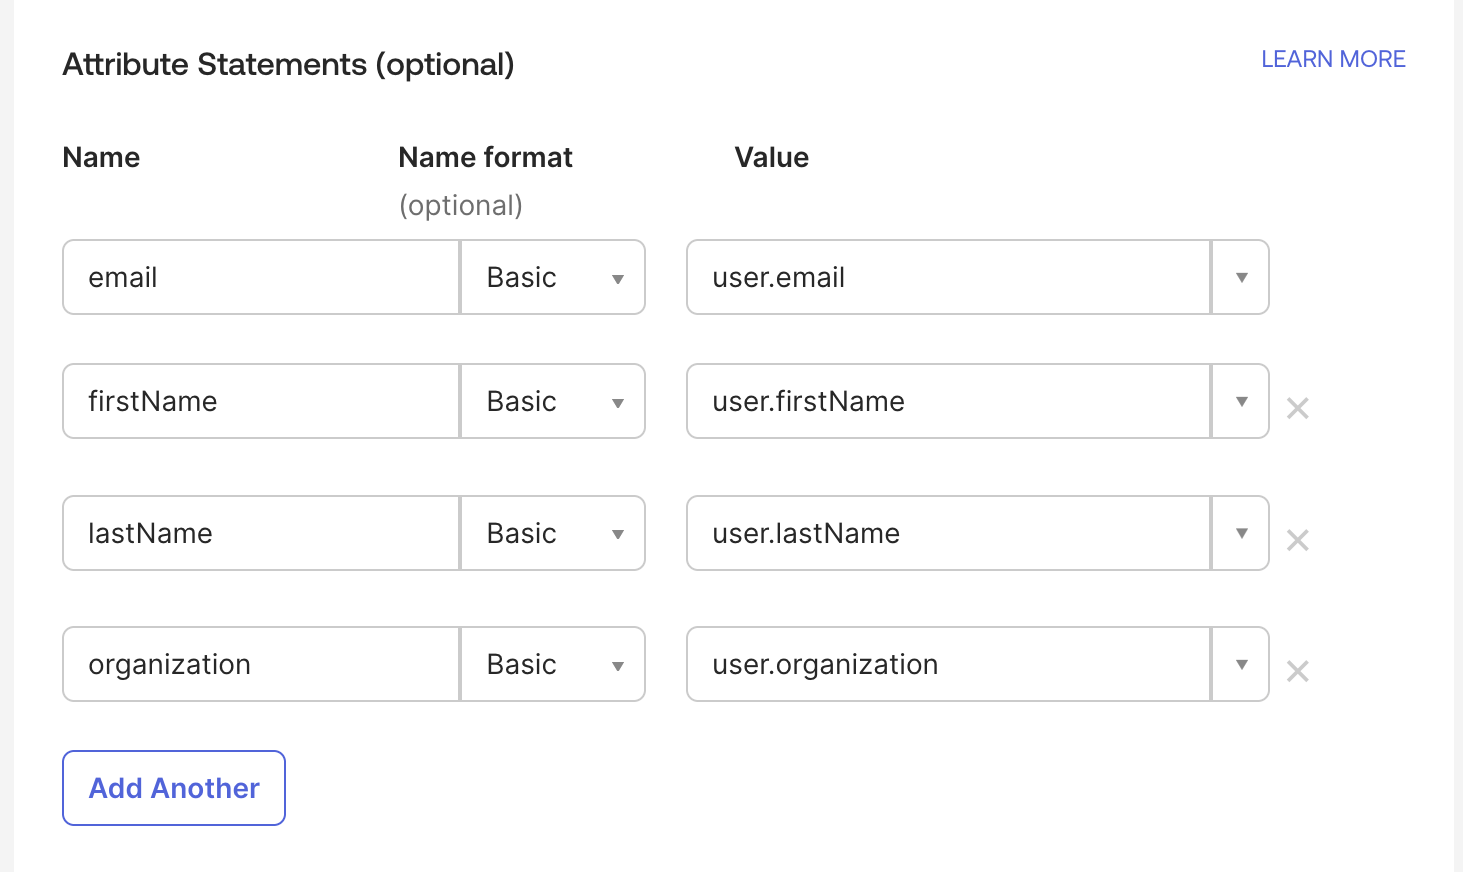
Map the following Okta attributes to Perplexity requirements:
|
Attribute Name |
Name Format |
Value |
|
|
Basic |
user.email |
|
firstName |
Basic |
user.firstName |
|
lastName |
Basic |
user.lastName |
|
organization |
Basic |
user.organization (or user.department) |
-
In the Attribute Statements section, click Add Another
-
Enter email as Name, leave Name format as Basic, enter user.email as Value
-
Add firstName attribute with user.firstName value
-
Add lastName attribute with user.lastName value
-
Add organization attribute with user.organization or user.department value
6: Configure Group Attribute Statements (Optional)
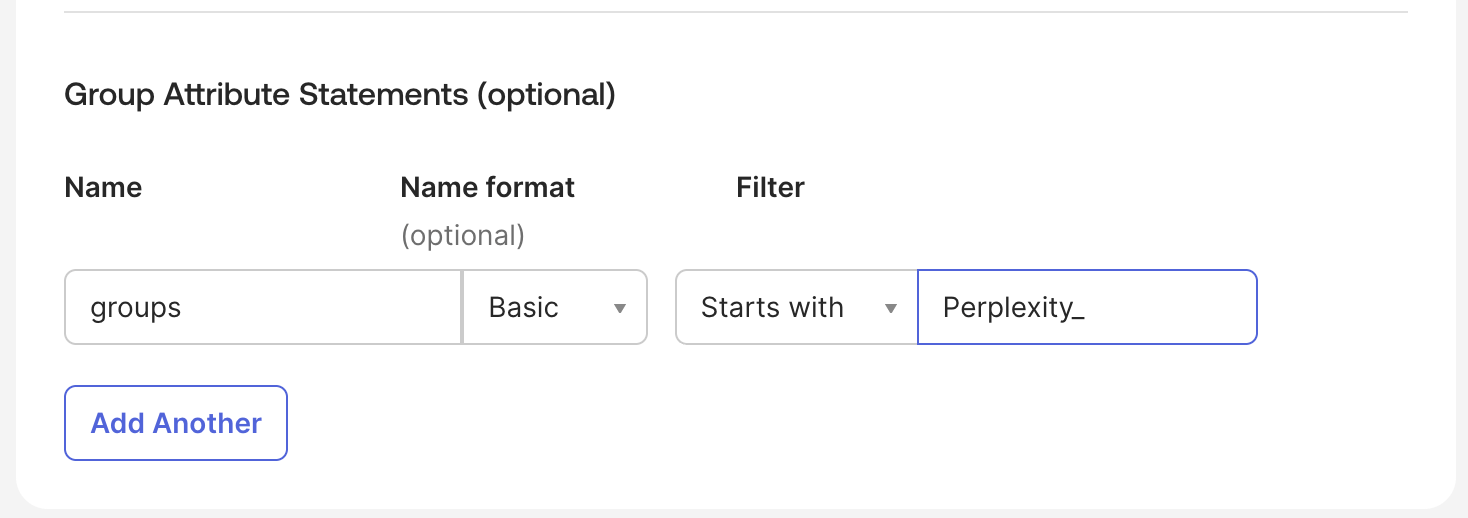
For advanced group-based access control, fill out the Group Attribute Statements section:
-
Name: groups
-
Name format: Basic
-
Filter: Choose relevant filter (e.g., "Starts with" and enter "Perplexity_")
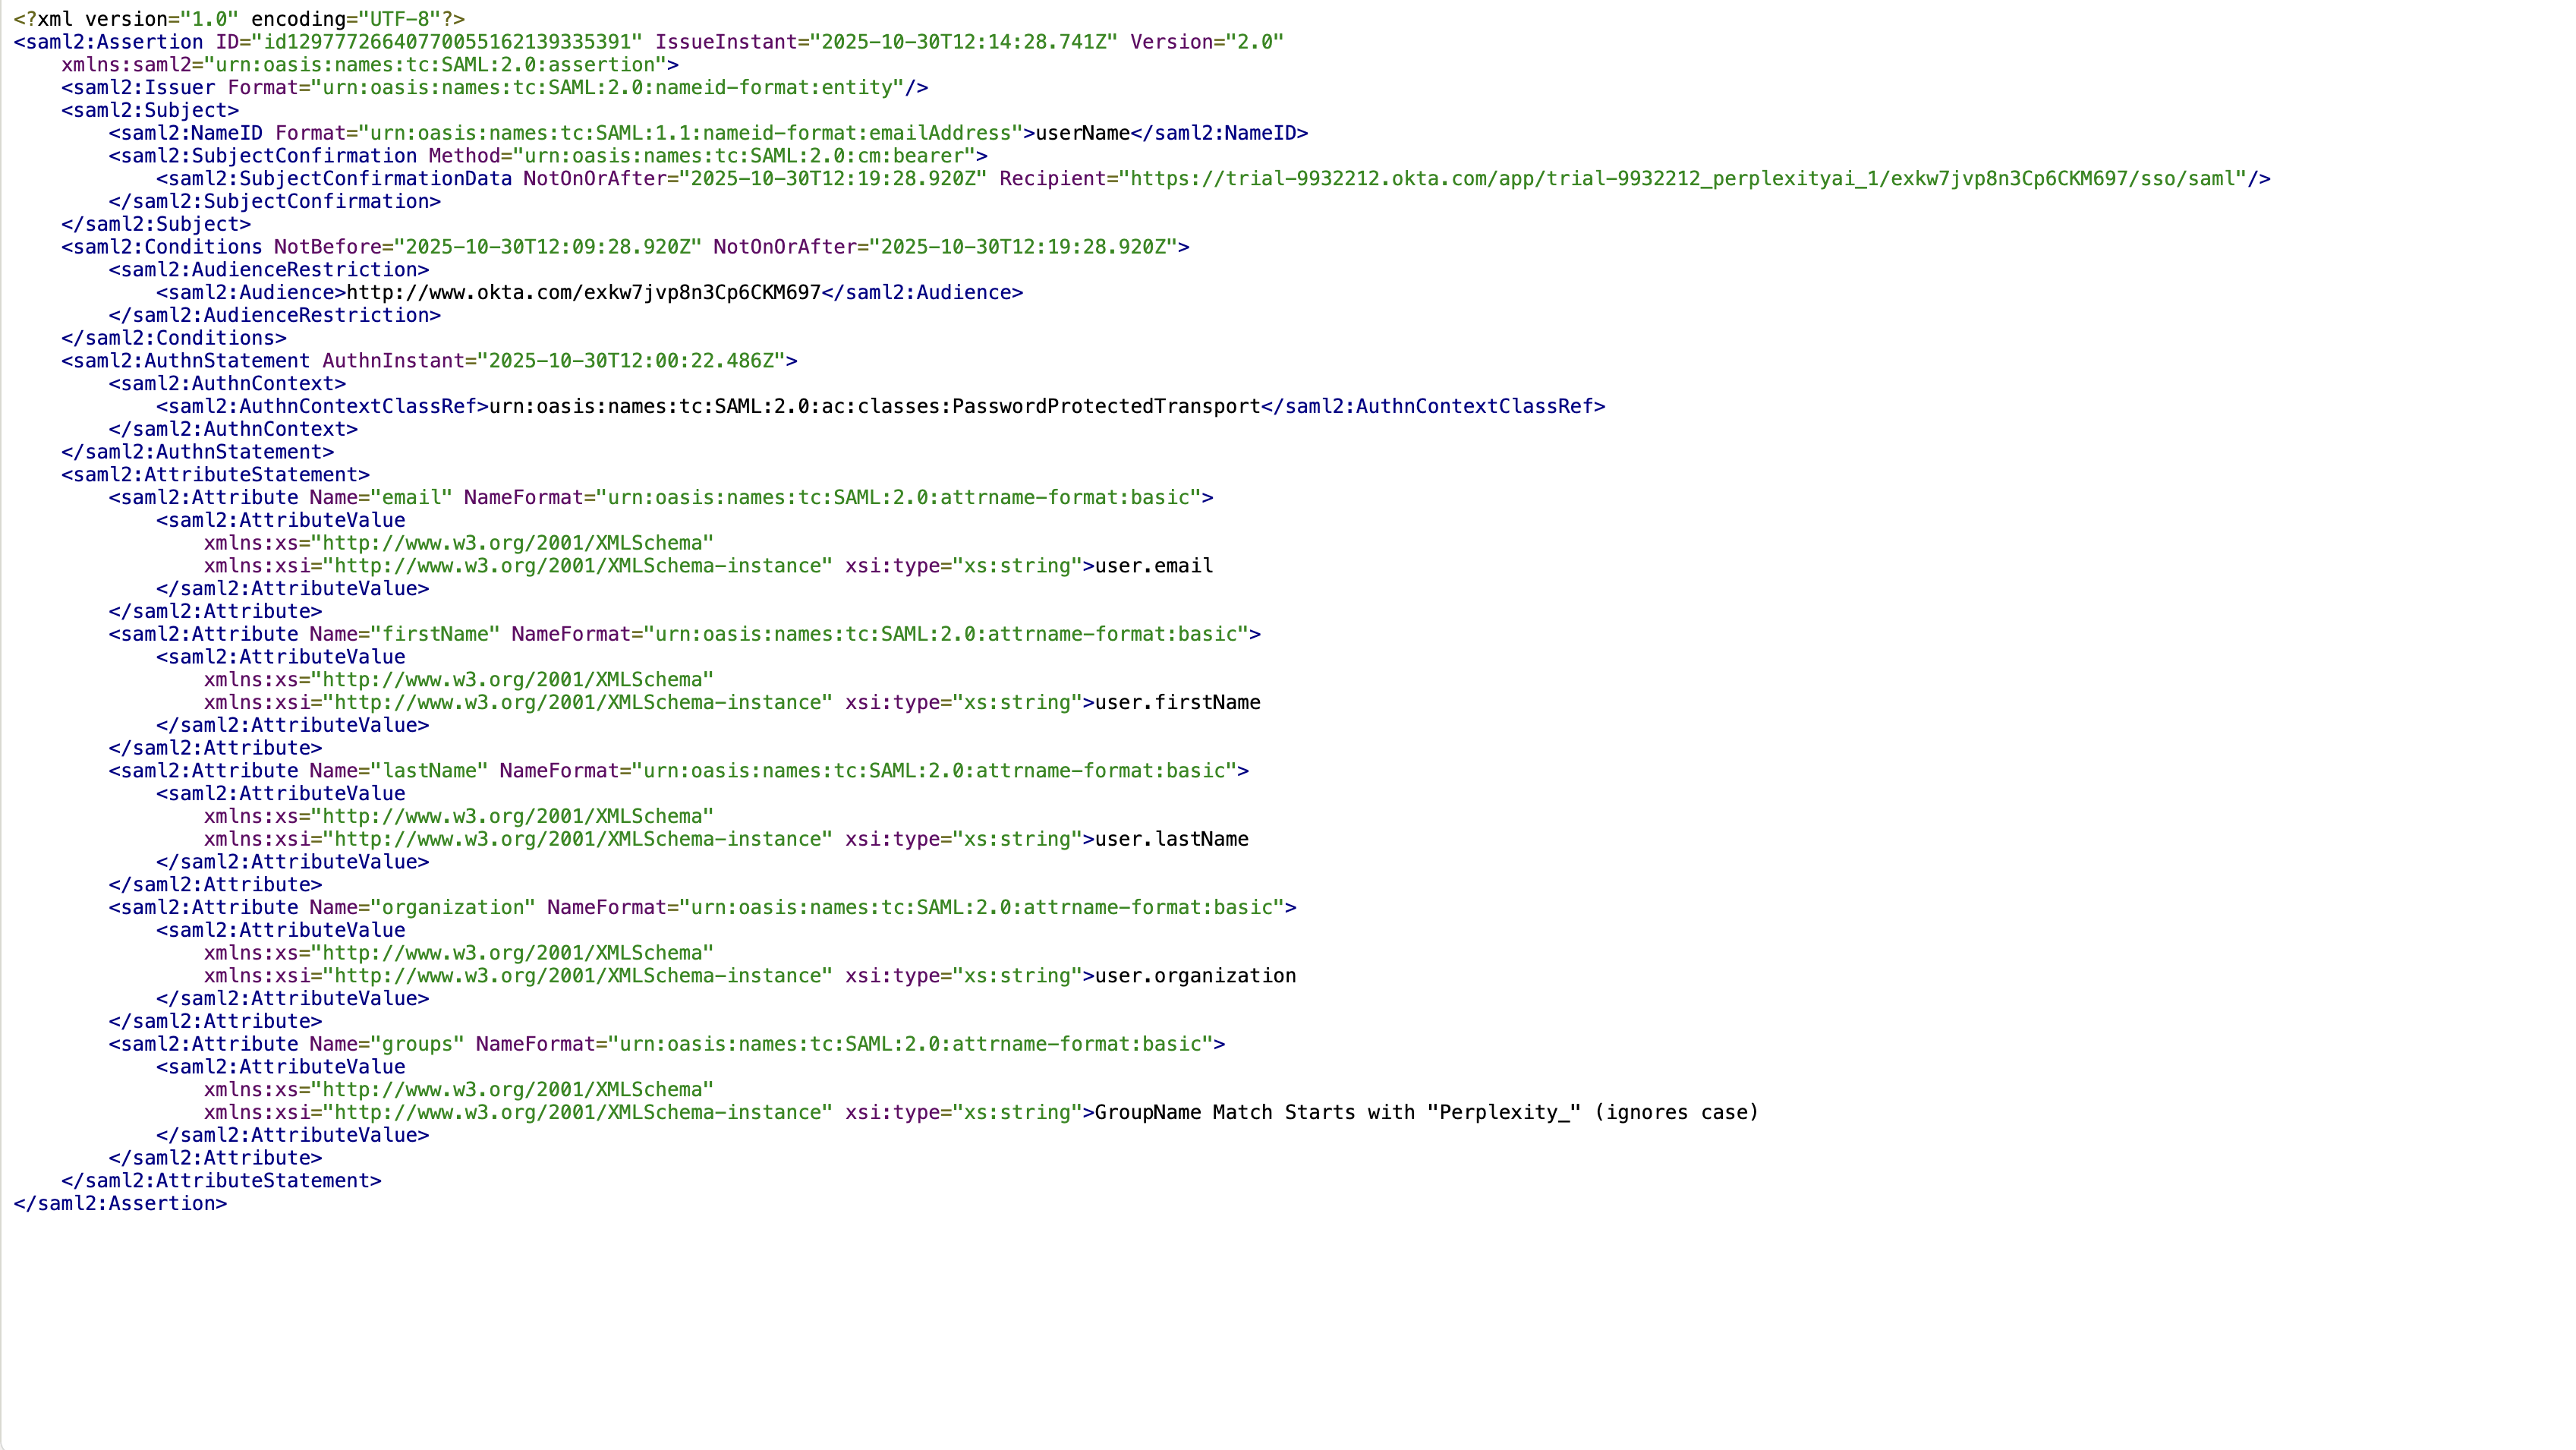
7. Optional: Preview the SAML assertion
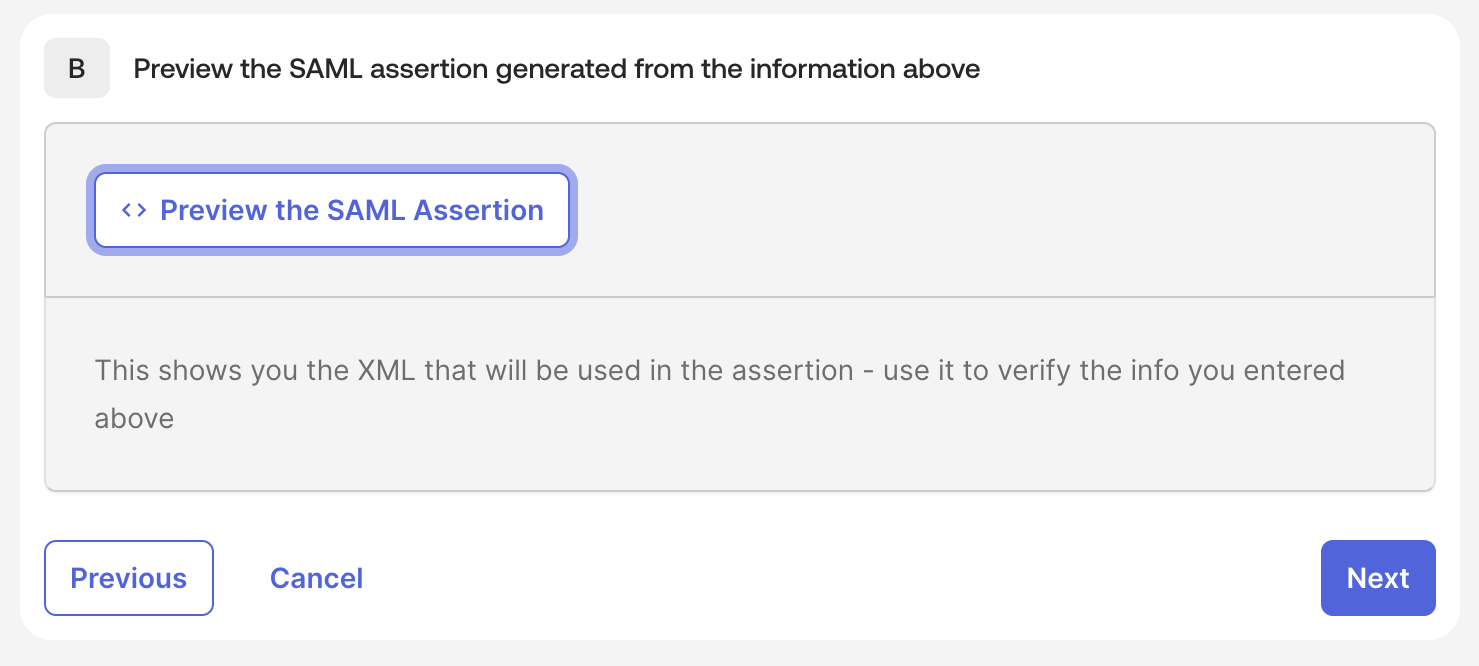
Click Preview the SAML Assertion to see the XML that will be used in the assertion, and to verify the information you entered.
8. Feedback and Finish
You can provide to Okta more information about the SAML app. This section is optional.
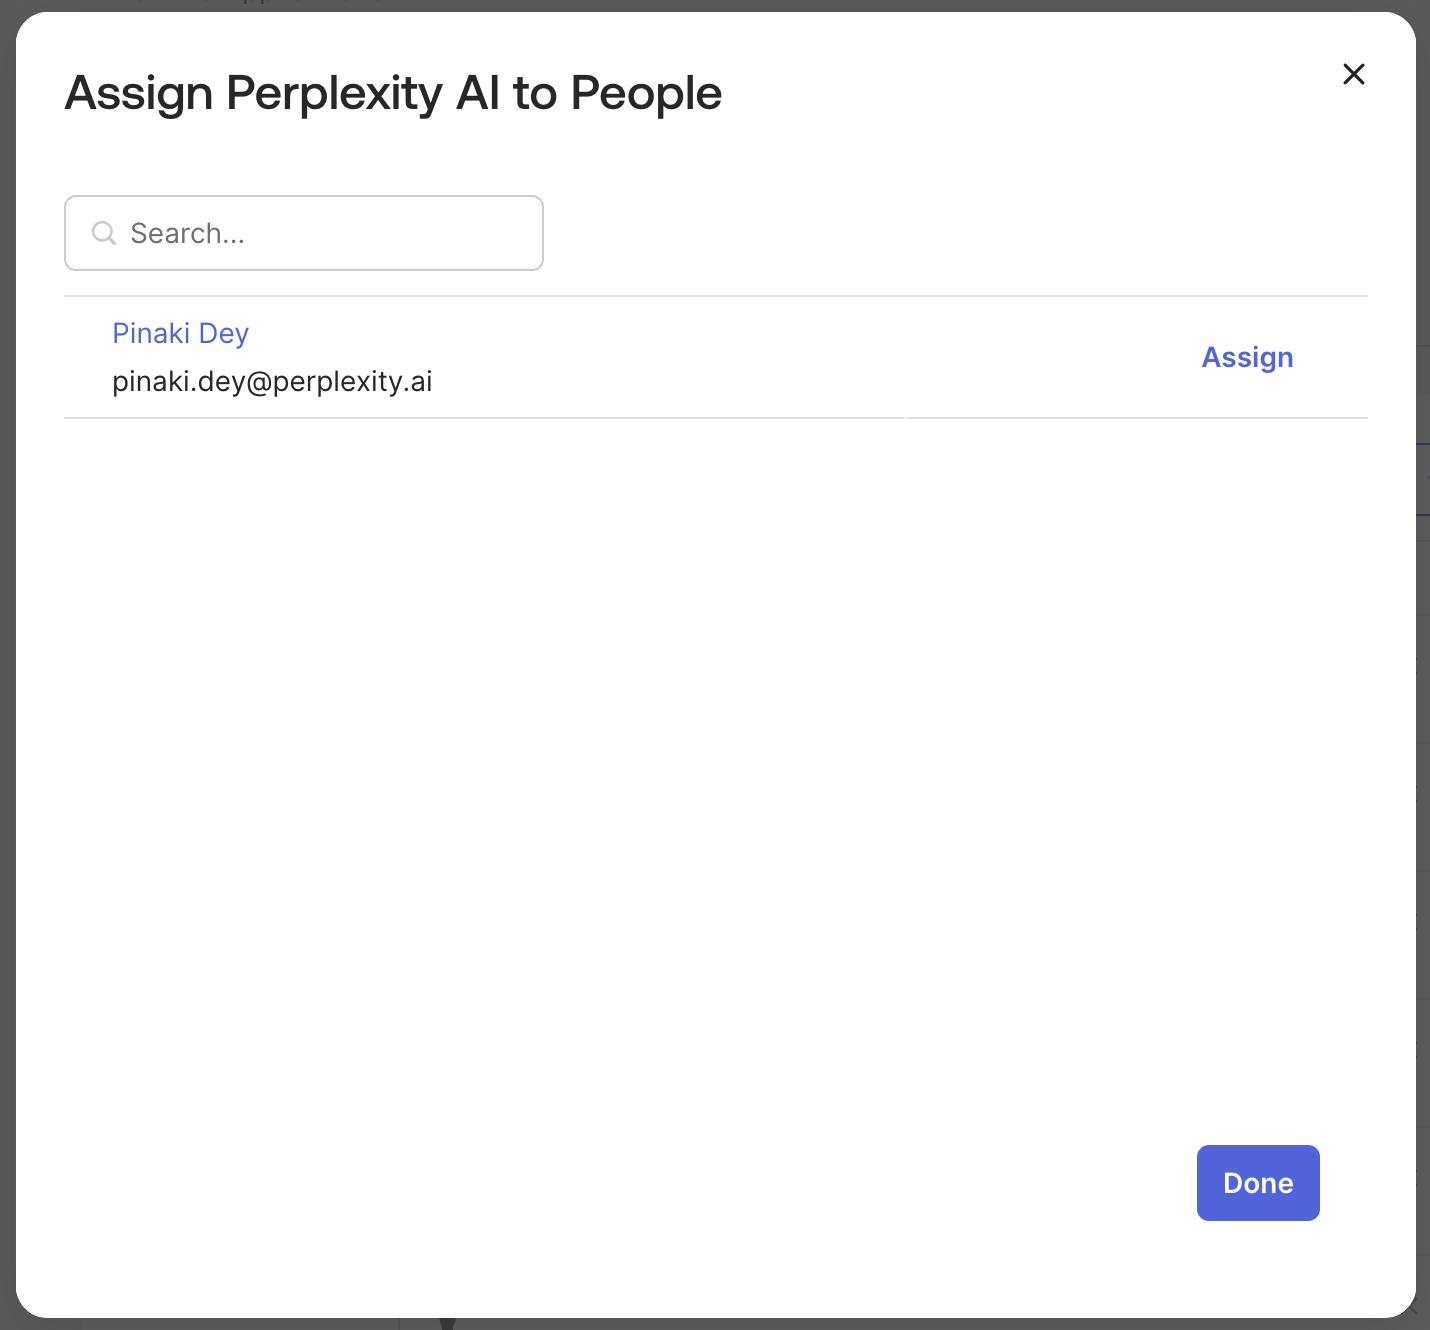
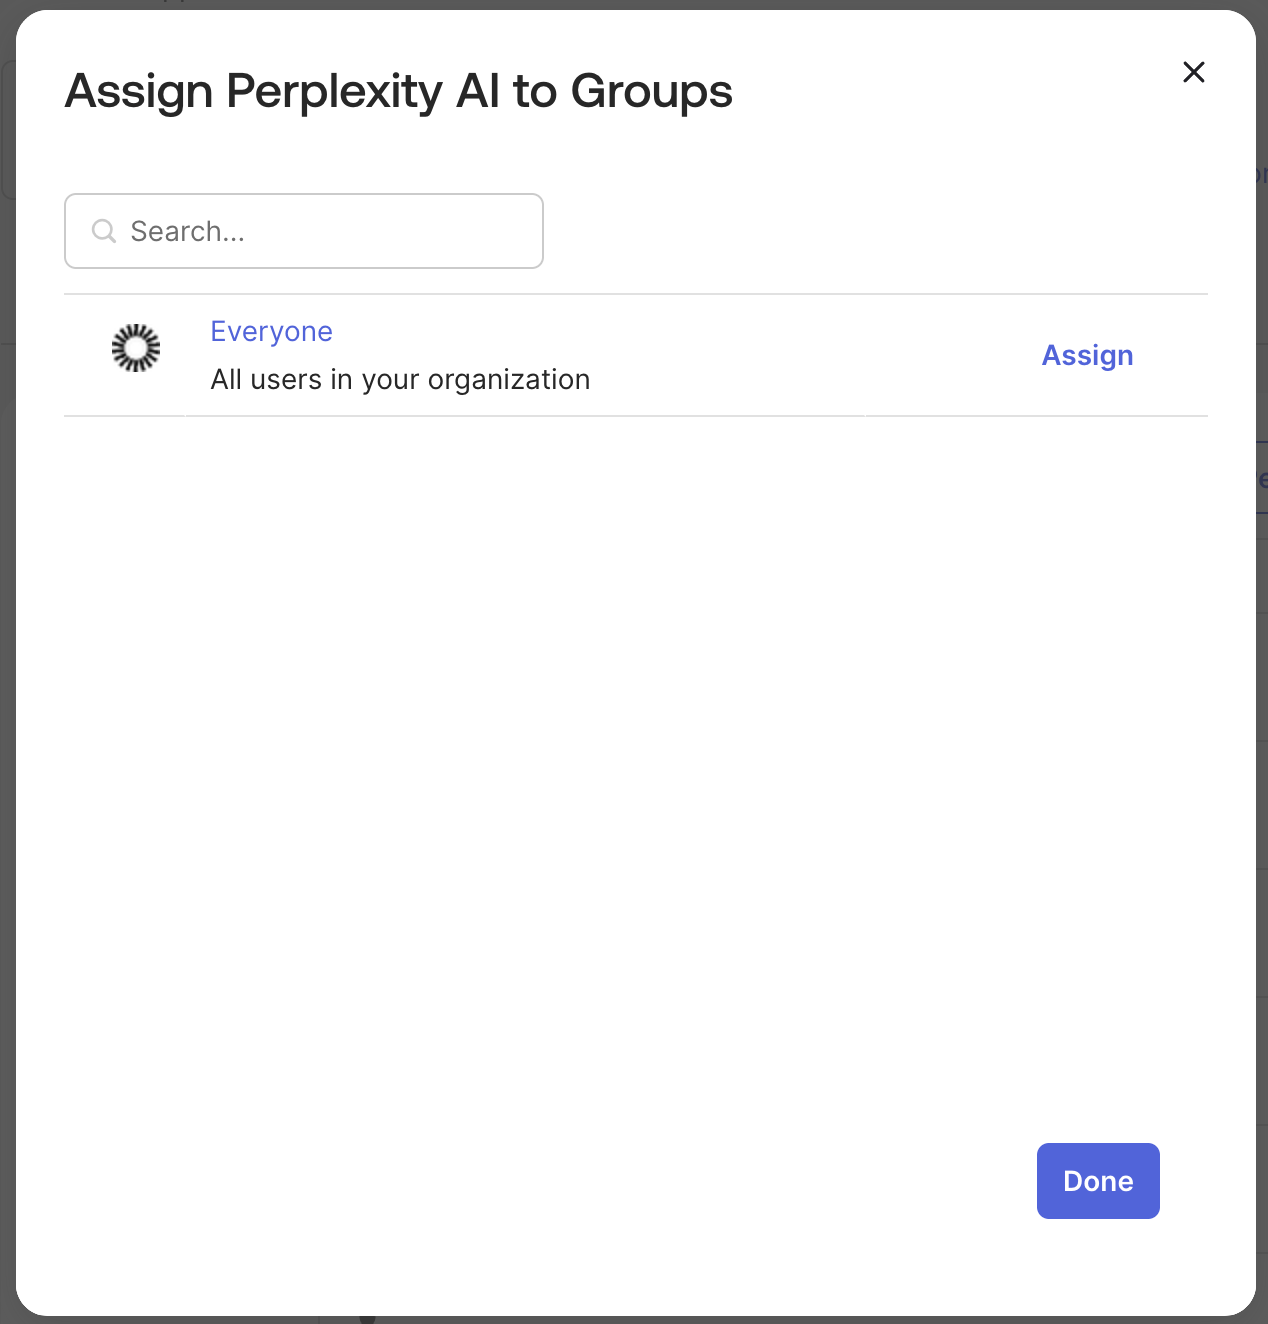
9. Assign Users and Groups
Once you have created the Perplexity app, it’s time to assign users and/or groups to it.
-
Navigate to the Assignments tab in your newly created Perplexity app
-
Click Assign > Assign to People for individual user assignment
-
Or click Assign > Assign to Groups for group-based assignment
It’s a good idea to create two groups (e.g., PPLX_Admin and PPLX_Members) before this step, and add users to these groups. You can then assign access to those groups in the Perplexity app in Okta.
-
For initial testing, you can assign only your test users or a test group
-
Click Save and Go Back after making assignments

10. Optional: Configure Automated Provisioning (SCIM)
For automated user provisioning and deprovisioning:
-
Navigate to the Provisioning tab
-
Click Configure API Integration
-
Check Enable API integration
-
Follow the steps you’ll find in this article, and configure provisioning features as needed.
Step 5: Testing and Verification
-
Logout from your current Perplexity session completely
-
Clear browser cache and cookies to ensure clean testing environment, or use an Incognito browser window
-
Close all browser tabs related to Perplexity
-
Navigate to Perplexity sign-in, and enter email address from verified domain (e.g.,
testuser@yourcompany.com) -
Verify that you’re redirectred to Okta authentication page with your organization branding
-
Complete Okta authentication using test account credentials and any required MFA
-
Verify that you’re successfully redirected back to the Perplexity Enterprise dashboard
Currently, Perplexity does not support Identity Provider (IdP) initiated sessions.
However, there is a workaround: organizations can simulate IdP-initiated sessions by setting the URL target of their IdP's Perplexity tile to an organization-specific URL that initiates the SSO flow. If you need this org-specific URL, please get in touch.
Troubleshooting Common Issues
SAML Authentication Failing
-
Symptoms: Users redirected to error page after Okta authentication
-
Solutions:
-
Verify ACS URL and Entity ID are correctly entered in Okta SAML settings
-
Check that attribute mapping includes required email, firstName, and lastName fields
-
Ensure Name ID format is set to "EmailAddress" in Okta
-
Validate Okta certificate hasn't expired
-
Review SAML response in browser developer tools for specific errors
-
Attribute Mapping Errors
-
Symptoms: User information not displaying correctly in Perplexity
-
Solutions:
-
Review Okta attribute statements configuration
-
Ensure all required attributes (email, firstName, lastName) are mapped correctly
-
Verify test user has necessary information populated in Okta profile
-
Check attribute names match exactly between Okta and Perplexity requirements
-
Invalid Domain Error
-
Symptoms: "Domain not verified" message during login
-
Solutions:
-
Confirm DNS TXT record is properly configured in domain DNS settings
-
Allow 24-48 hours for DNS propagation globally
-
Use DNS lookup tools to verify TXT record visibility from multiple locations
-
Contact domain administrator if DNS changes are restricted
-
User Assignment Problems
-
Symptoms: Users cannot access Perplexity app despite SSO configuration
-
Solutions:
-
Verify users are assigned to Perplexity application in Okta
-
Check group memberships if using group-based assignment
-
Ensure users have appropriate Perplexity Enterprise Pro licenses
-
Review Okta application assignment policies and rules
-
Other Resources
Perplexity Enterprise Support
-
Email: enterprise@perplexity.ai - this is out primary support channel for Enterprise customers
-
In-Product Chat: In Perplexity, you can Contact Support through the Learn More (’?’) button in the bottom-right corner.
-
LinkedIn: Follow @perplexityai for product announcements and updates
Perplexity Documentation and Resources
-
Trust Center: www.perplexity.ai/trust - Security and compliance information
-
API Documentation: docs.perplexity.ai for developers
Okta Resources
-
Okta Admin Documentation: help.okta.com for comprehensive Okta configuration guides
-
SAML Configuration Guide: Okta's official SAML 2.0 setup documentation
-
Okta Community: developer.okta.com/community for peer support and best practices
-
Okta Status: status.okta.com for service status and incident notifications